Hello!

My name is Matt Allison.
I go by many titles with over a decade of experience in the design industry. My work has been featured in various lifestyle publications including Home, House & Leisure, Elle Decoration, VISI, Real Estate, Good Taste & The Sunday Times.
Based in Sydney, Australia my approach to interior styling and design is clean and timeless. I believe in creating spaces that are simple and functional, yet practical enough to deal with the ever-growing demands of daily life.
Thank you for visiting.
Category Archives: DIY
Make your own dipped utensils

I certainly can’t lay claim to this marvelous idea, paint dipping is showing up everywhere on everything from tin cans to entire furniture pieces.
What I can do is localise it and with trusted help of Plascon let’s launch into this weeks simple ‘How-To’.
Supplies needed: Wooden utensils, several tins of paint, masking tape, newsprint and a drying rack.
I chose to use Plascon’s Velvaglo, a unique polyurethane enamel that cross-links to form a resilient protective barrier that is Heat, Steam, Chip and Stain resistant. It is an extremely tough premium quality paint that offers a protective and decorative finish for walls and trim work.
While incredibly durable I’d like to interject and share that you should always handwash these utensils to prolong their life and make sure not to cover the surface that will be in contact with boiling water and/or food.
Pastels have made waves this year and will continue to do so in 2013 with Plascon’s PAUSE palette. I chose to use the following Plascon colours: Light Blue Green G6-A2-2, Endless Possibilities R6-B1-4 and Diamond White B1-A2-3.
Step 1. Start by taping up the non dipped end of your utensils with masking tape, this will prevent any dripping paint from adhering to the exposed surface.
Step 2. Carefully dip the dipping end into the paint, allowing several minutes for the excess to drip off.
Step 3. Place them in a utensil rack and allow to dry. Since the paint it fairly thick allow 24 hours to fully cure. I used a roll of mirror tape to prop up my smallest spoon to avoid paint dripping onto rack.
The great thing is that you can continue to add to your collection, varying the colours till your heart is content and it’s dead easy to accomplish!
I hope you enjoy your weekend and that it’s filled with crafty goodness!
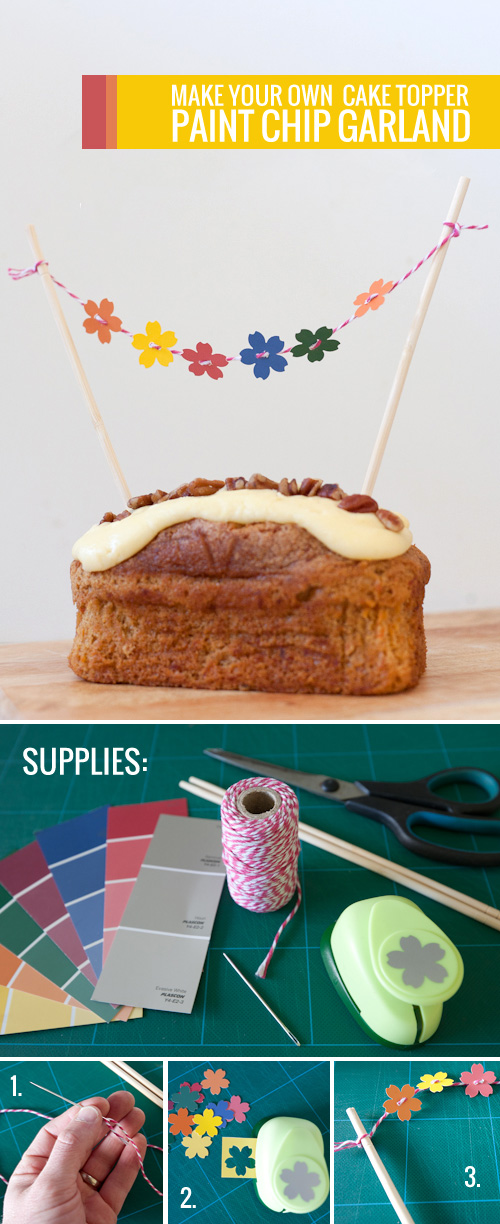
Make your own cake topper paint chip garland
If you are anything like me you’ve got a collection of paint chips lying around. Yes. Admit it.
You know, you were searching for the ultimate duck shell blue and walked off with 10 swatches and several paint samples before finding it. If you’re a horder you’ve got them, if not, you’ve tossed them.
May I suggest reusing them? There was a reason you gravitated towards them to begin with, so why not put them to use?
Today we had a carrot cake for afternoon tea and I thought what better way to reuse those chips than by making a crafty cake topper!
Supplies needed: A needle, twine, several paint chips, scissors, a craft punch and a pair of chopsticks.
I chose to use Plascon’s expression palate from their 2012 colour forecast.
Here’s how they describe it in their own words:
The time for subtlety is over. With a number of important events on the cards this year, a strong theme of celebration is making itself known. This comes through in the patriotic, Union Jack inspired red, white and blue to tie in with the London Olympics. White is often the base for this theme, with bold, uncomplicated use of bright colour to make a statement.
I used the following Plascon colours in my own garland from left to right: Baked Earth 04-B1-1, Panorama Lights Y4-A1-2, Lobster Red R5-B1-1, Oceanos B6-C1-1, Forest Found G4-D1-2 and to round it out I use a hue of Baked Earth called Alex 04-B1-2.
Step 1. Start by cutting a length of twine and threading it through your needle.
Step 2. Using a craft punch of your choice punch shapes out of your paint chips.
Step 3. Use your needle and thread to push through the chips before tying the loose ends to your pair of chopsticks and insert into your cake.
Presto!
You can continue to add to your garland and hang it as a decorative feature if you wish, but may I implore you not to raid your local hardware store paint cabinet to do so! The idea is to REUSE existing chips, not create further demand.